> ## Documentation Index
> Fetch the complete documentation index at: https://docs-dev-fix-docs-5528-php-updates.mintlify.site/llms.txt
> Use this file to discover all available pages before exploring further.
# Private Key JWT Client Authentication for Okta and OIDC Connections
> Learn how to implement Private Key JWT Client Authentication for your enterprise connections.
Private Key JWT Client Authentication is an alternative method of client authentication for OpenID Connect (OIDC) and Okta Workforce enterprise connections. While client authentication is most commonly handled by passing a shared client secret, Private Key JWT Client Authentication instead passes a signed JWT for improved application security.
By using this feature, you can avoid some common security shortcomings often seen with standard client secret authentication, such as:
* An increased risk of interception and re-use, as client secrets must be transmitted between parties for every request.
* Limited mechanisms available to enforce expiration and prevent re-use by malicious actors.
* An increased risk of leaks or exposure due to both parties holding the client secret.
You can set up Private Key JWT Client Authentication for your OIDC and Okta Workforce enterprise connections through either the Auth0 Dashboard or the Management API.
## How it works
The OIDC Connection flow uses authenticated endpoints such as `/oauth/token` or `/oauth/par` to verify a client’s identity against the authorization server or OpenID provider. With Private Key JWT Client Authentication, a signed client assertion JWT is passed to the OpenID provider instead of a client secret.
The client assertion JWT contains the following claims:
* An `aud` (audience) identifying the OpenID provider’s token endpoint.
* A `jti` (JWT ID) to enable one-time use or replay protection.
* An `exp` (expiration time) that limits the token’s validity window.
* A `sub` and `iss` identifying the client ID.
Private Key JWT Client Authentication offers a more secure method of authentication by eliminating the use of shared client secrets. Instead, the JWT is signed using the client’s private key, and the OpenID provider only has access to the public key.
### Private Key JWT Client Authentication Flow
After a user completes authentication with an upstream identity provider (IdP), the user is redirected to Auth0 with an authorization code that is exchanged for tokens at the OpenID provider’s token endpoint. When Private Key JWT is enabled for a connection, the call to the OpenID provider’s token endpoint uses a client assertion instead of a client secret for a more secure authentication.
The following steps demonstrate a typical Private Key JWT Client Authentication flow.
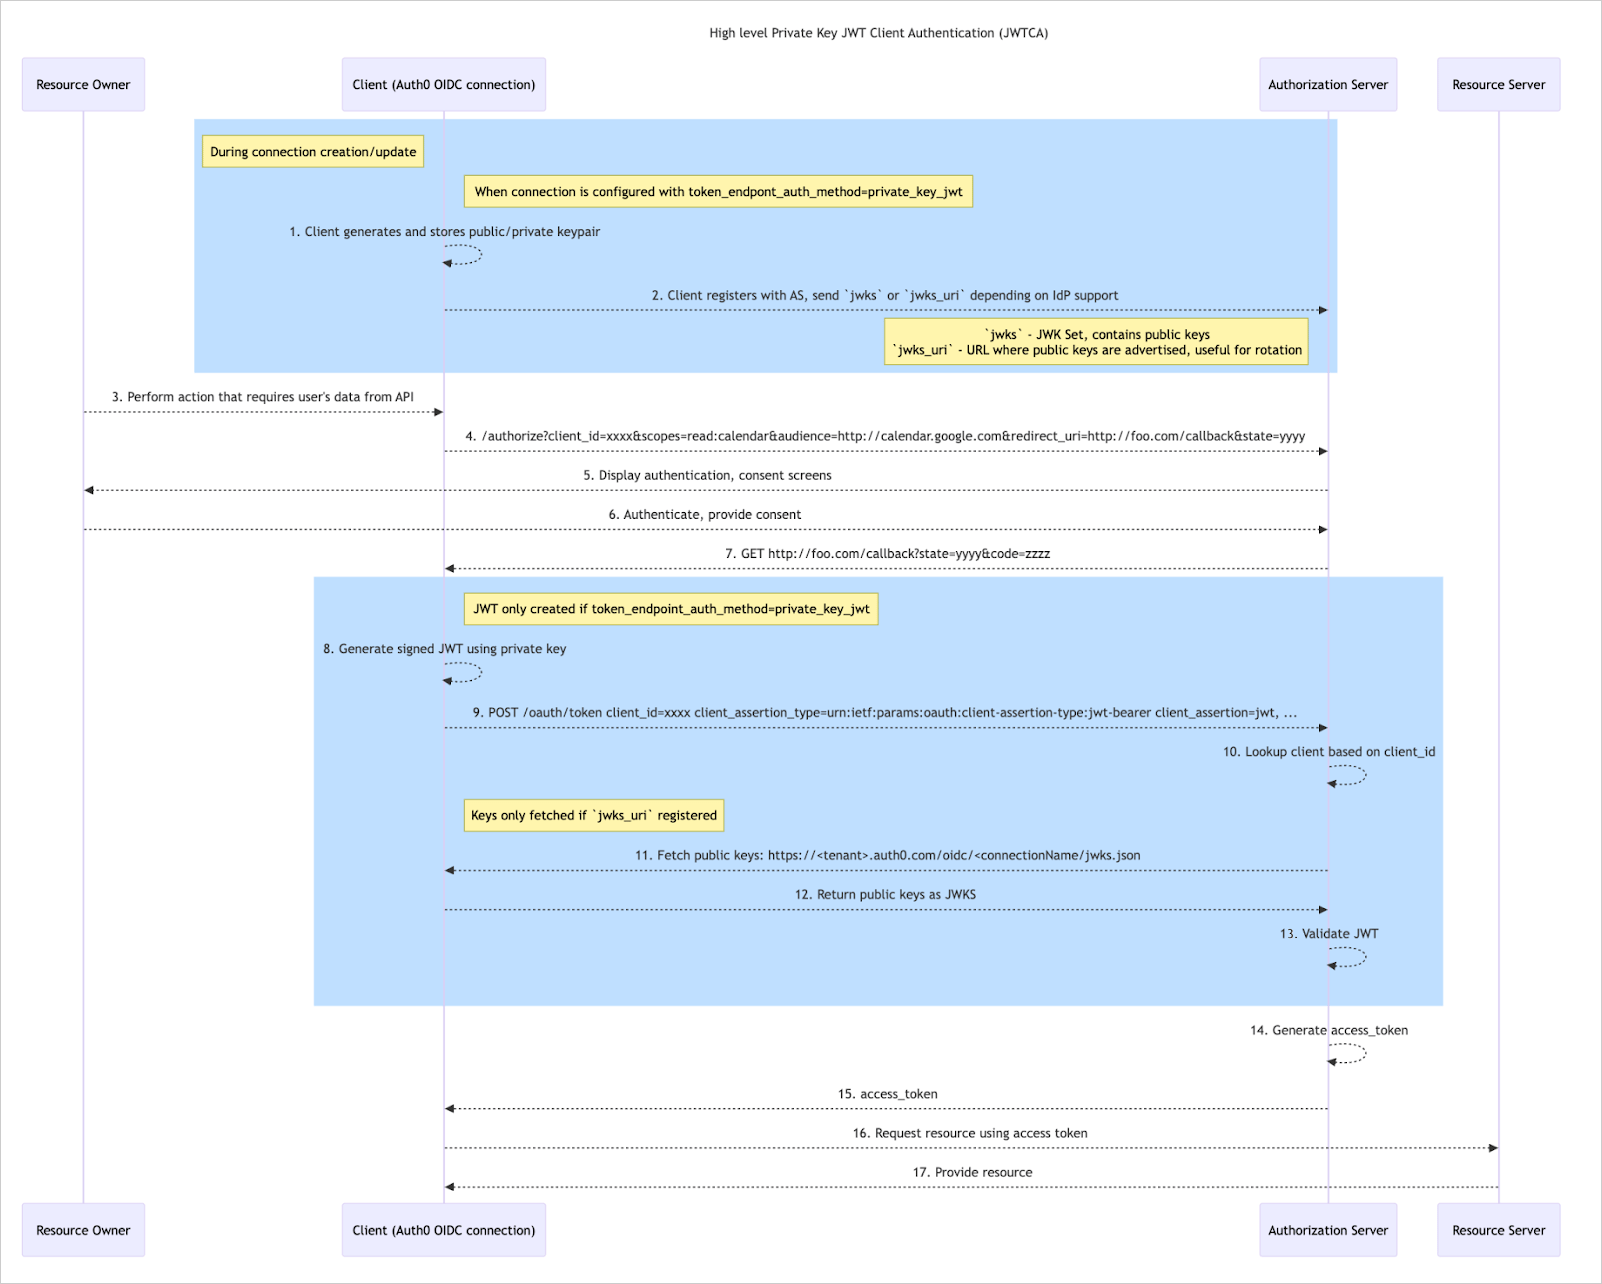 To complete this flow, you must first configure a new or existing OIDC or Okta Workforce connection with `token_endpoint_auth_method=private_key_jwt` through either your Auth0 Dashboard or the Management API. To learn more, review the [Configure Private Key JWT Client Authentication](#configure-private-key-jwt-client-authentication) section.
1. After configuring your connection, Auth0 automatically generates and stores two public and private key pairs.
* One key pair is the active `current` set, while the other set is labeled as `next` to support [key rotation](#rotate-signing-keys).
2. Depending on your IDP, you next either:
* Download the `current` public key and upload the file to the Authorization Server, or:
* Copy and paste the [`jwks_uri`](#retrieve-signing-keys) to the Authorization Server.
3. A user performs an action that requires authentication, such as logging in to your application.
4. Auth0 sends a request to the Authorization Server to initiate authentication.
5. The Authorization Server displays authentication and consent screens to the user.
6. The user authenticates and provides consent to the Authorization Server.
7. The Authorization Server sends an authorization code to Auth0.
8. Auth0 generates a client assertion JWT and signs it using the `current` private key.
9. Auth0 passes the client assertion JWT to the Authorization Server.
10. The Authorization Server looks up the client based on the provided `client_id`.
11. The Authorization Server fetches public keys from Auth0 if a `jwks_uri` was provided; otherwise, the server identifies the public key registered in step 2.
12. If the `jwks_uri` was requested, Auth0 returns the public keys as JWKS.
13. The Authorization Server validates the JWT by verifying the signature with the `current` public key, identified by `kid` in the header of the `client_assertion` JWT.
14. The Authorization Server generates an access token.
15. The Authorization Server passes the access token to Auth0.
16. Using the access token, Auth0 requests a resource from the Resource Server.
17. The Resource Server provides the resource to complete the flow.
## Configure Private Key JWT Client Authentication
You can configure OIDC and Okta Workforce enterprise connections to use Private Key JWT Client Authentication through either the Auth0 Dashboard or Management API. Steps for each method are provided below.
* Private and public signing key pairs are automatically generated by Auth0 per connection.
* You can currently only use the RS256 algorithm for signing client assertion JWTs.
* Signed JWTs expire automatically after 60 seconds.
#### Auth0 Dashboard
You can use the Auth0 Dashboard to configure Private Key JWT Client Authentication for both new and existing OIDC and Okta Workforce connections.
If your custom OIDC connection uses an IdP that does not advertise support for back-channel communication or `private_key_jwt` as a client authentication method in its metadata, you will not be able to set up Private Key JWT Client Authentication through the Auth0 Dashboard.
1. On your Auth0 Dashboard, navigate to [Authentication > Enterprise](https://manage.auth0.com/#/connections/enterprise).
2. Next to **OpenID Connect** or **Okta Workforce** , select **Create** .
3. In the **General** section, provide details for your new connection, including its name and discovery URL.
4. Configure the following fields to enable Private Key JWT:
* Set **Communication Channel** to **Back Channel** .
* Set **Authentication Method** to **Private Key JWT** .
5. Select **Create** to save your new connection.
1. On your Auth0 Dashboard, navigate to [Authentication > Enterprise](https://manage.auth0.com/#/connections/enterprise).
2. Next to **OpenID Connect** or **Okta Workforce** , select **Browse** .
3. Choose the appropriate connection. Then, access its **Credentials** tab.
4. Under **Authentication Settings** , configure the following:
* Set **Communication Channel** to **Back Channel** .
* Set **Authentication Method** to **Private Key JWT** .
5. Select **Save** at the bottom of the screen.
6. On the confirmation popup, select **Change** to implement your modifications.
#### Management API
You can use the Management API to configure Private Key JWT Client Authentication for both new and existing OIDC connections.
To create a new OIDC connection that uses Private Key JWT Client Authentication, call the [Create a Connection](/docs/ja-jp/api/management/v2/connections/post-connections) endpoint with the following `connection.options` properties set appropriately:
| Property | Description |
| --------------------------------- | ------------------------------------------------------------------------------------------------------------------------------------------------------------------------------------------------------------------------------------------------------------ |
| `type` | Set this property to `back_channel`. |
| `token_endpoint_auth_method` | Set this property to `private_key_jwt`.
To complete this flow, you must first configure a new or existing OIDC or Okta Workforce connection with `token_endpoint_auth_method=private_key_jwt` through either your Auth0 Dashboard or the Management API. To learn more, review the [Configure Private Key JWT Client Authentication](#configure-private-key-jwt-client-authentication) section.
1. After configuring your connection, Auth0 automatically generates and stores two public and private key pairs.
* One key pair is the active `current` set, while the other set is labeled as `next` to support [key rotation](#rotate-signing-keys).
2. Depending on your IDP, you next either:
* Download the `current` public key and upload the file to the Authorization Server, or:
* Copy and paste the [`jwks_uri`](#retrieve-signing-keys) to the Authorization Server.
3. A user performs an action that requires authentication, such as logging in to your application.
4. Auth0 sends a request to the Authorization Server to initiate authentication.
5. The Authorization Server displays authentication and consent screens to the user.
6. The user authenticates and provides consent to the Authorization Server.
7. The Authorization Server sends an authorization code to Auth0.
8. Auth0 generates a client assertion JWT and signs it using the `current` private key.
9. Auth0 passes the client assertion JWT to the Authorization Server.
10. The Authorization Server looks up the client based on the provided `client_id`.
11. The Authorization Server fetches public keys from Auth0 if a `jwks_uri` was provided; otherwise, the server identifies the public key registered in step 2.
12. If the `jwks_uri` was requested, Auth0 returns the public keys as JWKS.
13. The Authorization Server validates the JWT by verifying the signature with the `current` public key, identified by `kid` in the header of the `client_assertion` JWT.
14. The Authorization Server generates an access token.
15. The Authorization Server passes the access token to Auth0.
16. Using the access token, Auth0 requests a resource from the Resource Server.
17. The Resource Server provides the resource to complete the flow.
## Configure Private Key JWT Client Authentication
You can configure OIDC and Okta Workforce enterprise connections to use Private Key JWT Client Authentication through either the Auth0 Dashboard or Management API. Steps for each method are provided below.
* Private and public signing key pairs are automatically generated by Auth0 per connection.
* You can currently only use the RS256 algorithm for signing client assertion JWTs.
* Signed JWTs expire automatically after 60 seconds.
#### Auth0 Dashboard
You can use the Auth0 Dashboard to configure Private Key JWT Client Authentication for both new and existing OIDC and Okta Workforce connections.
If your custom OIDC connection uses an IdP that does not advertise support for back-channel communication or `private_key_jwt` as a client authentication method in its metadata, you will not be able to set up Private Key JWT Client Authentication through the Auth0 Dashboard.
1. On your Auth0 Dashboard, navigate to [Authentication > Enterprise](https://manage.auth0.com/#/connections/enterprise).
2. Next to **OpenID Connect** or **Okta Workforce** , select **Create** .
3. In the **General** section, provide details for your new connection, including its name and discovery URL.
4. Configure the following fields to enable Private Key JWT:
* Set **Communication Channel** to **Back Channel** .
* Set **Authentication Method** to **Private Key JWT** .
5. Select **Create** to save your new connection.
1. On your Auth0 Dashboard, navigate to [Authentication > Enterprise](https://manage.auth0.com/#/connections/enterprise).
2. Next to **OpenID Connect** or **Okta Workforce** , select **Browse** .
3. Choose the appropriate connection. Then, access its **Credentials** tab.
4. Under **Authentication Settings** , configure the following:
* Set **Communication Channel** to **Back Channel** .
* Set **Authentication Method** to **Private Key JWT** .
5. Select **Save** at the bottom of the screen.
6. On the confirmation popup, select **Change** to implement your modifications.
#### Management API
You can use the Management API to configure Private Key JWT Client Authentication for both new and existing OIDC connections.
To create a new OIDC connection that uses Private Key JWT Client Authentication, call the [Create a Connection](/docs/ja-jp/api/management/v2/connections/post-connections) endpoint with the following `connection.options` properties set appropriately:
| Property | Description |
| --------------------------------- | ------------------------------------------------------------------------------------------------------------------------------------------------------------------------------------------------------------------------------------------------------------ |
| `type` | Set this property to `back_channel`. |
| `token_endpoint_auth_method` | Set this property to `private_key_jwt`.
**Notes:**- By default, this property is set to `client_secret_post`.
- Errors may occur if this property is set to a value other than `private_key_jwt` or `client_secret_post`.
|
| `token_endpoint_auth_signing_alg` | Set this property to `RS256`, `RS512`, `PS256`, `PS384`, `ES256`, or `ES384`.
Omitting this property will default its value to `RS256`. |
**Example POST call**
```js lines theme={null}
POST /api2/connections
{
strategy: 'oidc',
options: {
type: "back_channel",
token_endpoint_auth_method: "private_key_jwt",
token_endpoint_auth_signing_alg: "RS256"
},
…
}
```
To modify an existing OIDC connection to use Private Key JWT Client Authentication, call the [Update a Connection](/docs/ja-jp/api/management/v2/connections/patch-connections-by-id) endpoint with the following `connection.options` properties set appropriately:
| Property | Description |
| ---------------------------- | ------------------------------------------------------------------------------------------------------------------------------------------------------------------------------------------- |
| `type` | Set this property to `back_channel`. |
| `token_endpoint_auth_method` | Set this property to `private_key_jwt`.
**Notes:** - Errors may occur if this property is set to a value other than `private_key_jwt` or `client_secret_post`.
|
**Example PATCH call**
```js lines theme={null}
PATCH /api2/connections/{id}
{
strategy: 'oidc',
options: {
type: "back_channel",
token_endpoint_auth_method: "private_key_jwt"
},
…
}
```
## Retrieve Signing Keys
After your connection has been configured to use Private Key JWT Client Authentication, you can retrieve its public keys through either the Auth0 Dashboard, the Management API, or a public JWKS URI.
To retrieve signing keys through the Auth0 Dashboard:
1. Navigate to [Authentication > Enterprise](https://manage.auth0.com/#/connections/enterprise).
2. Next to **OpenID Connect** or **Okta Workforce** , select **Browse** .
3. Choose the appropriate connection. Then, access its **Credentials** tab.
4. Locate the **Credentials** section and select the **Download** icon next to the appropriate signing key.
To view public keys through the Management API, call the Retrieve Connection Signing Keys endpoint using the ID of your connection.
Use of this endpoint requires the `read:connections_keys` scope.
**Example GET call**
```js lines theme={null}
GET /api2/connections/{id}/keys
```
**Example response**
```js lines expandable theme={null}
{
cert: "-----BEGIN CERTIFICATE-----
MIIDDTCCAfWgAwIBAgIJP...Ek=
-----END CERTIFICATE-----",
pkcs7: "-----BEGIN PKCS7-----
MIIDPAYJKoZIhvcNAQcCo...AA==
-----END PKCS7-----
",
kid: "E4CXqUP6r92yo0f_sdkdC",
next: true,
fingerprint: "7F:33:86:D9:4A:98:B2:DC:B0:41:74:54:DA:31:E7:74:42:32:96:8C",
thumbprint: "7F3386D94A98B2DCB0417454DA31E7744232968C"
},
{
cert: "-----BEGIN CERTIFICATE-----
MIIDDTCCAfWgAwIBAgI...Ss=
-----END CERTIFICATE-----",
pkcs7: "-----BEGIN PKCS7-----
MIIDPAYJKoZIhvcNAQ...AA==
-----END PKCS7-----
",
kid: "_4WuXpXlwwmSE65saKWDM",
current: true,
current_since: "2025-01-24T08:50:06.662Z",
fingerprint: "33:7D:6F:35:46:31:AD:6E:69:43:01:A2:77:DF:8E:73:64:F6:E8:5B",
thumbprint: "337D6F354631AD6E694301A277DF8E7364F6E85B"
},
{
cert: "-----BEGIN CERTIFICATE-----
MIIDDTCCAfWgAwIBA...6Q=
-----END CERTIFICATE-----",
pkcs7: "-----BEGIN PKCS7-----
MIIDPAYJKoZIhvcN...AA==
-----END PKCS7-----
",
kid: "roUD9STeDy9qBTx5XjaTz",
previous: true,
current_since: "2025-01-24T08:48:51.523Z",
current_until: "2025-01-24T08:50:06.663Z",
fingerprint: "44:D3:DD:3B:63:99:59:9A:39:D9:F4:F0:4F:1B:AC:BB:18:72:40:5C",
thumbprint: "44D3DD3B6399599A39D9F4F04F1BACBB1872405C"
}
```
Some identity providers allow public keys for private\_key\_jwt to be provided in the form of a public JWKS (JSON Web Key Set) URI.
If public keys have been generated for a connection, you can retrieve them by adding the following URI to your IdP configuration:
```http wrap lines theme={null}
https://{auth0 domain}/oauth/connection/{connection name}/.well-known/jwks.json
```
JWKS URIs count towards global rate limits. You can use caching of public keys to avoid reaching these limits. As best practice, Auth0 recommends a cache interval of at least 5-10 minutes to avoid calling the JWKS URI endpoint with each login attempt.
## Rotate Signing Keys
Private Key JWT Client Authentication supports signing key rotation for increased security compared to the static, long-lived nature of shared client secrets. Rotating signing keys enhances security by limiting the exposure time of any single key, reducing the window of opportunity for an attacker to compromise it. It also allows for rapid response in the wake of a security incident.
To avoid disruption, Auth0 recommends rotating signing keys after one year. You can use either the Auth0 Dashboard or the Management API to rotate signing keys:
To rotate your signing keys through the Auth0 Dashboard:
1. Navigate to [Authentication > Enterprise](https://manage.auth0.com/#/connections/enterprise).
2. Next to **OpenID Connect** or **Okta Workforce** , select **Browse** .
3. Choose the appropriate connection. Then, access its **Credentials** tab.
4. In the **Credentials** section, select **Rotate Keys** .
5. On the popup, select **Save** to confirm the rotation.
After rotation, any in-flight JWTs signed with the previous key immediately become inactive and may fail verification with your IdP.
To view public keys through the Management API, call the Rotate Connection Signing Keys endpoint using the ID of your connection.
Use of this endpoint requires both `create:connections_keys` and `update:connections_keys` scopes.
```js lines theme={null}
POST /v2/connections/{id}/keys/rotate
```
After rotation, any in-flight JWTs signed with the previous key immediately become inactive and may fail verification with your IdP.
On your OIDC or Okta Workforce connection, your signing keys are assigned one of the following statuses:
* **Current** : The signing key currently in use for the application.
* **Next** : The next signing key to use for the application after the current key is revoked.
* **Previous** : An expired or otherwise revoked signing key that is no longer in use.
When Private Key JWT Client Authentication is first enabled for a connection, only a `current` and `next` keypair is generated. A key is only marked as `previous` after rotation occurs.
When rotating signing keys, the following changes occur:
1. The `current` key is removed and revoked, and any JWTs signed with this key will fail verification with the IdP if the IdP was configured with the `jwks_uri`.
2. The `current` key is assigned the `previous` status.
3. The `next` key becomes the active key and is given the `current` status. Going forward, client assertion JWTs will be signed with this key.
4. A new signing key is automatically generated to replace the rotated key. The new signing key has the `next` status.
## もっと詳しく
* [Auth0 ApplicationをOkta Workforce Enterprise Connectionに接続する](/docs/ja-jp/authenticate/identity-providers/enterprise-identity-providers/okta)
* [OpenID ConnectのIDプロバイダーに接続する](/docs/ja-jp/authenticate/identity-providers/enterprise-identity-providers/oidc)